Suburbanwhisk Travels… to the North Fork

Long Island looks like a giant fish.  In that island, there are two boroughs of New York City, Nassau County and Suffolk County.  Most people tend to only hear of the South Fork for the Hamptons and Montauk.  My favorite spot on Long Island is the North Fork.  There are 20 miles of vineyards along with numerous farm stands.  Whenever I go there, I do not feel that I am on Long Island.  Take a look for yourself.

vineyard north fork matt

(above picture from my friend)

Popeye

If you live locally, you can easily make it a day trip. It is about 60-70 miles from my house.  If you choose, there are a bunch of places/bed and breakfasts/motels that you can stay at.

On this particular daytrip, I went to three vineyards along another couple.  It was a gray day with misting rain, so I was not looking for places with a large uncovered patio.

Palmer Vineyards – We sat in their covered patio.  This vineyard allows you to bring your own food.  This is a plus as not all places allow you too.  They also offer food from a food truck along with treats from Greenport’s Noah’s.  You are only allowed to taste by the glass or tasting here.  They do not allow open bottles, unlike other places.  I got a tasting that included three whites and one rose.

Schinn Estate Vineyards and Farmhouse – We got a bottle to split while we sat outside.  At first, it was misting rain, but it cleared up.  We also tasted two glasses of wine.  No outside food was allowed, but we were so full from the prior vineyard with our snacks of cheese and crackers, potato chips, and vegetables.

Kontokosta Vineyard – This vineyard is opened until 6PM -Which is a good thing when you are headed towards an earlier dinner reservation in Greenport.  What is nice about this vineyard is that you can take the bottle or glass of wine and walk outside towards the bluff.  The bluff overlooks the Long Island Sound.  While it was gray outside, it was still peaceful.

bluff north fork

We headed into Greenport for dinner.  We ate at Noah’s, which is a mostly small plate restaurant. The roasted garlic bruschetta was a favorite of mine.

Before we headed home, we stopped at the bar of First and South.  They had wine on tap from some of the vineyards.  After another glass of rose, we headed home.

There are only three more weekends until the unofficial summer closing.  This trip can be done at any time, including the winter.

What are some of your favorite wineries?

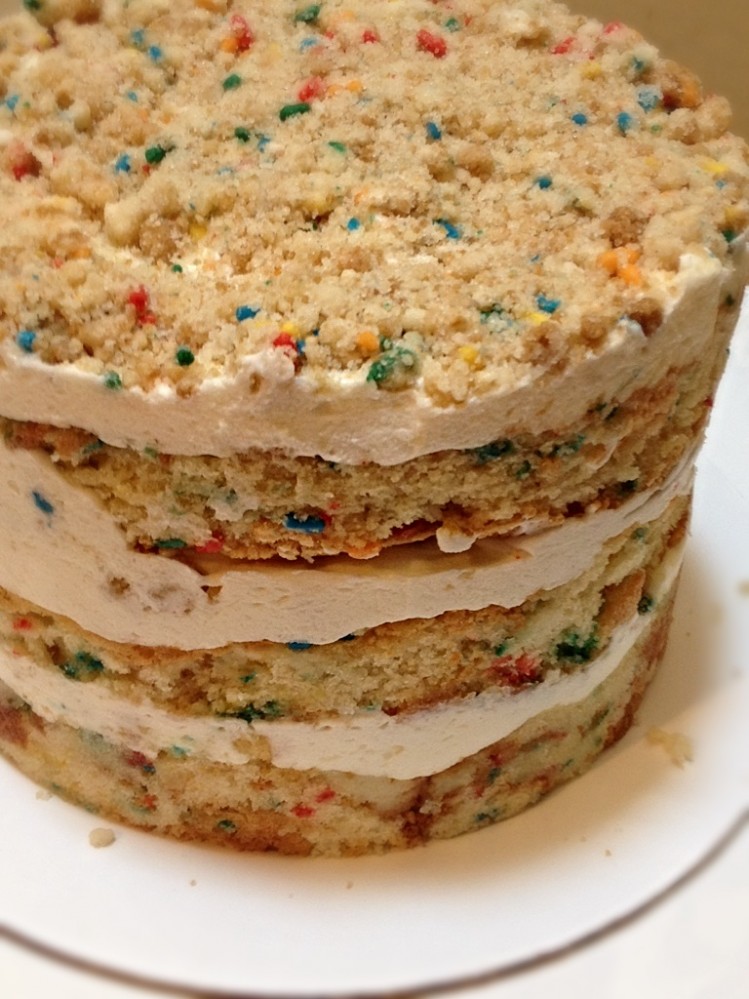
Momofuku Milk Bar Birthday Cake

When Momofuku first opened up their restaurant, I dragged my then boyfriend (now hubby) there.  I had to try their ramen noodles that New York Magazine stated was the best.  A few years later, Milk Bar opened.  A couple of years after that – their cookbook came out.  Even though Milk Bar has expanded to multiple locations throughout the year, it is still never where I am or I forget there is a location where I am.  I originally had this cake at a bridal shower for a friend.  After eating it, I could not wait to make it myself to share.

So off to Amazon I went to order some materials that I needed.  You will need a 6 inch cake ring and cake collars.  After seeing the price of cake collars, I did a little investigating.  Apparently, cake collars are transparencies from the overhead projector that was used when I was in school.  I ordered a few of those and cut them to size.

It is best to break up this project into three days.

Day 1:  Make the cake and cake crumbs

Day 2: Make the frosting, the soak, and clean out your freezer.   Then, assemble the cake.  Place cake in freezer.

Day 3: Take out cake from freezer.  Take off cake ring.  Defrost in fridge for at least three hours.  Eat the cake

From the Momofuku Milk Bar website

Birthday Layer Cake

Makes 1 (6-inch) layer cake, 5 to 6 inches tall.

Serves 6 to 8

The Cake

makes 1 quarter sheet pan

55 g butter, at room temperature (4 tablespoons, 1/2 stick)
60 g vegetable shortening (1/3 cup)
250 g granulated sugar (1 1/4 cups)
50 g light brown sugar (3 tbsp. tightly packed)
3 eggs, room temperature
110 g buttermilk (½ cup)
65 g grapeseed oil (1/3 cup) (I used vegetable oil and it tasted fine)
8 g clear vanilla extract (2 tsp.)
245 g cake flour (2 cups)
6 g baking powder (1 ½ tsp.)
3 g kosher salt (¾ tsp.)
50 g rainbow sprinkles (1/4 cup) (in the batter)
25 g rainbow sprinkles (2 tbsp.) (extra on top)

Preheat oven to 350°F.  Combine the butter, shortening, and sugars in the bowl of a stand mixer fitted with the paddle attachment and cream together on medium-high for 2 to 3 minutes. Scrape down the sides of the bowl before you add the eggs.  Mix on medium-high for 2 to 3 minutes and scrape down the sides of the bowl once more.  On low speed, slowly add buttermilk, oil, and vanilla.  Increase the speed of the mixer to medium-high and mix for 4-6 minutes,   until the mixture is practically white, twice the size of your original mixture.  Scrape down the sides of the bowl.  On low speed, add the cake flour, baking powder, salt, and the in the batter rainbow sprinkles.  Mix for approximately a minute, until it comes together.  Scrape down the sides of the bowl.

Line a quarter sheet pan with parchment and butter.  Pour the cake batter onto the sheet pan using a spatula make it even.  Sprinkle the extra sprinkles on top of the batter.

Bake the cake for 30-35 minutes.  The cake will double in size and remain dense.  At 30 minutes, poke the edge of the cake with your finger.  If it bounces back slightly and the center does not jiggle, it will be done.

Take the cake out of the oven and cool on a wire rack.  Store the cooled cake in the fridge, wrapped in plastic wrap, for up to five day.

The Soak

55 g milk (¼ cup)
4 g clear vanilla extract (1 tsp.)

Whisk together the milk and vanilla in a small bowl.

The Frosting
makes about 2 cups

115 g butter, at room temperature (8 tbsp/ 1 stick)
50 g vegetable shortening (¼  cup)
55 g cream cheese (2 oz.)
25 g glucose (1 tbsp. (I omitted and did not taste a difference)
18 g corn syrup (1 tbsp.)
12 g clear vanilla extract (1 tbsp.)
200 g confectioners’ sugar (1 ¼cups)
2 g kosher salt (½ teaspoon)
.25 g baking powder (pinch)
.25 g citric acid (pinch) (I omitted)

Combine butter, shortening, and cream cheese in the bowl of a stand mixer fitted with the paddle attachment.  Cream the ingredients together for 2-3 minutes on medium-high, until the mixture is smooth and fluffy.  Scrape down the sides of the bowl.  Put the mixer on low, stream in the glucose, corn syrup, and vanilla.  Put the mixer onto medium high and beat for 2-3 minutes, until the mixture is glossy white and smooth.  Scrape down the sides of the bowl.  With the mixer on low, add the confectioners’ sugar, salt, baking powder, and citric acid.  Bring back the speed to medium-high and beat for 2-3 minutes.  Use the frosting right away or store in an airtight container in the fridge for up to a week.

The Crumb
makes about 2 ¼ cups

100 g granulated sugar (½ cup)
25 g light brown sugar (1 ½ tbsp. tightly packed)
90 g cake flour (¾cup)
2 g baking powder (½ tsp.)
2 g kosher salt (½ tsp.)
20 g rainbow sprinkles (2 tbsp.)
40 g grapeseed oil (¼ cup) (I used vegetable oil)
12 g clear vanilla extract (1 tbsp.)

Preheat the oven to 300°F.  Combine all of the ingredients but the oil and vanilla in a stand mixer fitted with the paddle attachment and mix on low speed until combined.  Add the oil and vanilla on low to have the ingredients form small clusters.  Place the clusters onto a cookie sheet lined with parchment.  Bake for 20 minutes.  Allow the crumbs to cool and store in an airtight container.  It will stay fresh for 1 week at room temperature or 1 month in the fridge or freezer.

Put it together

Put a piece of parchment paper lined cookie tray on a counter.  Peel off the parchment paper from the bottom of the cake by inverting it.  Use the cake ring to stamp out 2 circles from the cake.  Place cake ring on parchment paper lined cookie tray along with a cake collar inside the cake ring. Use the non –stamped parts of the cake to make the bottom layer of the cake.  Mush the leftovers together and use the back of your hand to have them come together into one layer.  Use a pastry brush to soak the bottom layer of the cake with the soak.  Use a fifth of the frosting layer over the cake evenly.   Place 1/3 of the crumbs over the frosting.  Apply another layer of frosting (1/5) over the crumbs.

Place another cake collar in the cake ring.  Place a layer of cake onto the building tower of cake.  Follow the same steps from the first layer (soak, frosting, crumbs, frosting).  Place the final layer of the cake onto the tower.   Put the rest of the frosting onto the cake.  Use the rest of the crumbs to decorate the top of the cake.

Place the cake for a minimum of 12 hours to set the cake. You can keep it in the freezer for up to two weeks.

Pull the cake out of the freezer at least three hours before you are to serve the cake. Pop the cake out of the cake ring and pull off all of the cake collars. Let the cake defrost in the fridge wrapped well in plastic for at least three hours and no more than five days. Serve the cake on a pretty cake stand.
momofuku cake 1

M&M Cookies

I have always been interested in baking.  In second grade, I was so happy to win third place in my troop’s baking competition.  Even though I think my mom was happier, as we did not have to go to the county baking competition.   Over the years, I have slightly altered this recipe to allow more molasses flavor from the brown sugar.  However, the end result is still the same wonderful taste that it has always been.  Why buy brand name cookies when you can make the same cookie with a better taste at home?

M&M  Cookie Recipe

Adapted from the back of the Nestle Tollhouse Chocolate Chip Bag

Yields about 30 cookies

Ingredients:

2¼ cups all-purpose flour
1 tsp. baking soda
1 tsp. salt
1 cup (2 sticks) butter, softened
½ cup granulated sugar
1 cup packed brown sugar
1 tsp. vanilla extract
2 large eggs, room temperature
2 cups M&Ms

Directions:

Combine dry ingredients in a small bowl (flour, baking soda, salt).  In large bowl, beat butter and sugars until creamy and continue to beat for approximately 5-7 minutes.  (I use my paddle attachment).  Add eggs, one at a time, beating well after each addition.  Once added both eggs, continue to beat until creamy again.  Beat in flour mixture, 1/3 at a time.  Stir in M&Ms.  Cover cookie dough with plastic wrap and refrigerate for 24 to 72 hours.

Allow the cookie dough to come to room temperature.  Preheat oven to 375° F.  Using a medium cookie scoop, scoop cookie dough onto baking sheets lined with parchment paper.  Place them about one inch apart.

Bake for 9 to 11 minutes, or until golden brown. Cool on baking sheets for two minutes.  Remove cookies to wire racks to allow them to cool completely.


TIP TUESDAY – Make Your Own Cake Flour

Have you run out of cake flour?  Are you looking for unbleached cake flour that is hard to find in the stores?  Look no further.  You can make it with ingredients from your own pantry.

Ingredients:

1 cup of all purpose flour minus two tbsp

2 tbsp of corn starch


Place ingredients into bowl and mix together.  Use as needed.  This recipe can easily be doubled, tripled, etc.  Store in pantry.

Roasted Potatoes

When my grandparents were growing up, their families had a traditional Friday night Shabbat dinner.  Their families had Matzah Ball Soup, Roasted Chicken, Roasted Potatoes or some other potato dish, along with the traditional Challah.  While that has trickled down to special occasions for my family, any night, including Friday, is a great night to make these roasted potatoes.

Roasted Potatoes

Serves 2, easily doubled

Ingredients:

2-3 medium Idaho Russet Potatoes

¼ cup Olive Oil

2 tbsp. Dried Rosemary

Sea Salt Pepper to taste

Preheat oven to 400F.  Scrub potatoes.  Cut into wedges or preferred shape.  (I used a heart shape cookie cutter to make these.)  For the heart potato wedges, cut potato into preferred thickness.  Insert cookie cutter into wedge to make the shape.   Place potato hearts into bowl with olive oil.  Place on cookie sheet (I line it with aluminum foil to make clean up easier).  Bake a 400F for approximately 25-30 minutes or until edges are brown.  Cooking time is for heart shape that is about 1 inch thick. 

Smores Movie Mix

I rarely go to the movie theater because I feel like it is on Redbox about a month or two later.  It is not like when I was a kid and had to wait a year to have a movie come onto VHS (yes, I am dating myself).  I will also admit that I still own a combination DVD/VHS player from college and sometimes may watch some Disney VHS tapes on it.  Two weekends ago, I was able to convince my husband to see a movie that I really wanted to see – Wish I Was Here­­  from Zach Braff.  Granted he didn’t want to go as he was not a fan of Garden State, like I was.  However, this movie won him over.  As for me, I loved it.  It is a perfect mix of comedy and drama.  It is now playing nationwide.  Regardless of where you are in your life, 20s, 50s, parent, grandparent, childless, you will be able to relate to it.

I went to a brunch time movie.  Knowing that I like to eat during the movies, I brought some snack mix in.  I have never been a popcorn person. As for chocolate candies, I felt that it would be too early for that.  Enter the Smores Movie Mix.  I saw a picture of this floating around the internet a while ago, and finally that memory of the picture allowed me to make it.

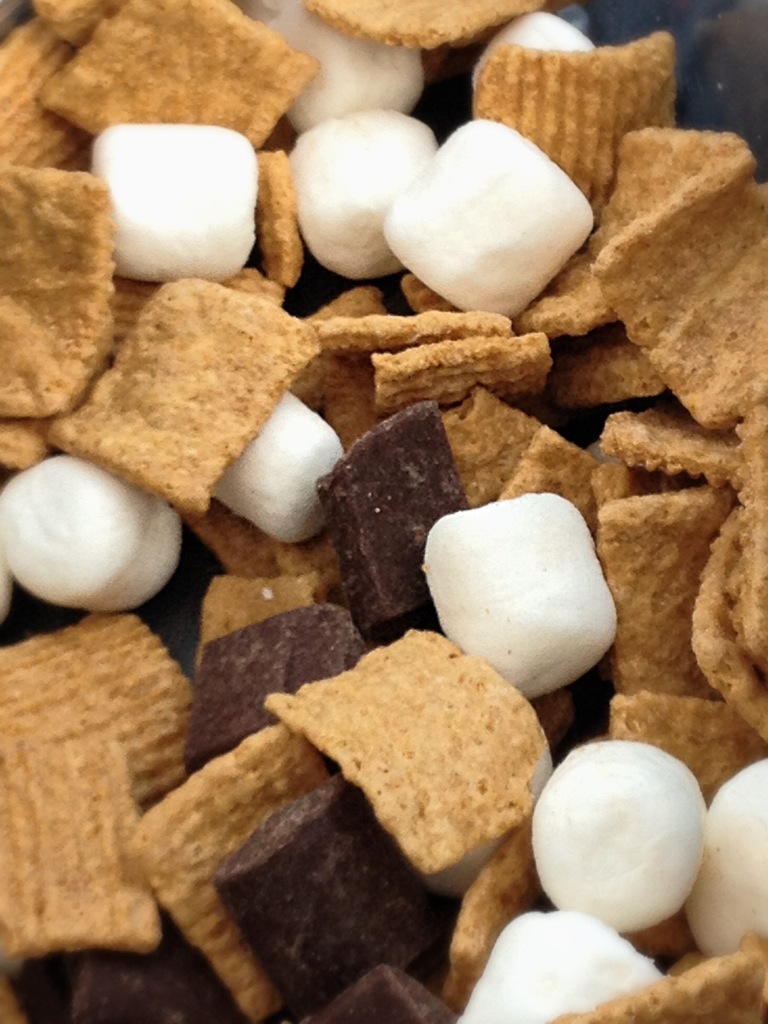
There is no exact science to making it.  All you need is three basic ingredients – Golden Graham (or some other graham cracker cereal), mini marshmallows, and chocolate chips (whatever you prefer – if you want to use white, dark, and milk – go for it.)

I used the proportions of 50% Golden Grahams, 25% marshmallows, and 25% chocolate chunks.  Place in to a bag or bowl and mix together.  It is that simple.

Enjoy the movie!

TIP TUESDAY – Transporting mini-cupcakes

If you have searched long and hard for a mini cupcake transporter like I have, you know it is either hard to find or too expensive for your budget.  Here is an easy way to transport mini cupcakes that will not break the bank, especially if you use a lot of eggs.

Step 1:  Find a egg carton

Step 2: Place mini cupcake (or muffin) into egg slot.

Step 3: Close the egg carton

Step 4: Transport the cupcakes

Step 5: Open the carton and serve

There you go – an easy way to transport mini cupcakes.  Just note – you do not have a lot of room in your container for a pile high of frosting.

Tie Dye Mini Cupcakes

TIE DYED CUPCAKES

I love anything tie dyed, even as a kid.  Most likely if it is a form of tie dye, I will try it.  My closet may or may not have a decent amount of it.  Bakedbymelissa has tie dyed cupcakes that are little – about the size of a quarter.  But I am too lazy to make the trek to the city or fight people to find a parking spot at Roosevelt Field to get some, so I decided to create my own.

Vanilla Mini Cupcakes

Barely adapted from Natasha’s Kitchen

Servings: Makes 24 mini cupcakes

1 ¼ cups cake flour

1 ¼ tsp baking powder

½ tsp baking soda

½ tsp salt

2 large eggs, at room temperature

¾ cup sugar

1 ½ tsp pure vanilla extract

½ cup vegetable oil

½ cup buttermilk 

Directions:

Preheat the oven to 350 degrees F and line a cupcake/muffin pan with cupcake liners.  In a medium bowl, whisk together the cake flour, baking powder, baking soda and salt. Set aside.  In the bowl of an electric mixer, beat 2 eggs with the paddle attachment on medium speed.  Add sugar and continue to beat on medium speed.   Add vanilla and oil and beat on medium speed until well combined, approximately one minute.  Reduce mixer speed to low-medium.  Add half of the flour mixture then mix until combined.  Then add half of the buttermilk and mix until combined.  Then add the rest of the flour combination, mix. Finally, add the rest of the buttermilk.  Make sure to scrape down sides between each addition.  Don’t worry if the batter is thin.

Divide the batter into small bowls, one for each color you want.  I would not use more than five colors.  I used red, yellow, green, blue, and purple.  Only use a little but of the food coloring as a little goes a long way.  Put a little bit of each batter into each mini cupcake tin.

Bake at 350F for approximately 9 minutes or until a toothpick comes out clean.  Let the cupcakes cool for a few minutes in the mini muffin tin and then allow them  to cool on a wired rack.

As the cupcakes cool, make the buttercream.

Whipped Vanilla Buttercream

Barely Adapted from Annie’s Eats

Servings: enough to frost about 2 dozen mini cupcakes

2 sticks unsalted butter, at room temperature

2 cups confectioners’ sugar, sifted

Pinch of salt

1 tbsp heavy cream

1 tbsp vanilla extract

Directions

Place the butter in the bowl of an electric mixer fitted with the paddle attachment.  Whip on medium-high speed until smooth, about 1 minute.  Add the confectioners’ sugar to the bowl and mix on medium-low speed just until incorporated.  Add in the salt and continue to beat on medium-high speed for 1-2 minutes, until smooth.  Mix in the heavy cream and vanilla on low speed just until incorporated.  Increase the mixer speed and whip on high speed until light and fluffy, scraping down the bowl as needed, about 4-5 minutes.

 Pipe or frost the cupcake however you want.  I went with two techniques using a large round piping tip.  One way, which you see on the left, is a dot.  Pipe down and place pressure on the bag, until you have the dot that you want.  On the right, use the same technique to place a blob onto the cupcake.  Smooth out the top until even using a straight edge spatula or butter knife.  Afterwards, use the straight edge to smooth out the side.   When done with frosting the cupcake add a few sprinkles, whatever you have available, on top.